
How to Implement OCR Tools with Cloud Vision API in Google Apps Script
In this article, we'll explore how to bring OCR (Optical Character Recognition) technology into your Google Apps Script projects using Google's Cloud Vision API. Don't worry if you're new to this, we'll walk through the setup step-by-step, from configuring your cloud projects to writing the scripts that can read text from images and PDFs. Whether you want to automate data entry or just learn more about how OCR works, you'll find easy-to-follow instructions and practical tips to get started. Let’s dive in!
Optical Character Recognition (OCR), which is often referred to as text recognition, converts images into digitally encoded text using specialized software, which enables a computer to convert a scanned document, a digital photo of text, or any other digital text image into machine-readable and editable data. This process is mainly used for text and/or data mining projects, textual comparisons, and is an important resource for creating accessible documents for blind and visually impaired persons (Russel, 2023).
This technology became popular in the early 1990s, as it was used to digitize historical newspapers, and ever since then it has undergone several improvements, with OCR software nowadays taking advantage of artificial intelligence to implement more advanced methods of intelligent character recognition (ICR) for identifying languages or handwriting (IBM, 2024).
How does OCR work?

Source: HighRadius
According to IBM (2024), there are 5 steps for OCR Processing:
1. Image acquisition: All document pages are copied and converted into a two-color or black-and-white version. The scanned-in image is analyzed for the program to identify the dark portions as characters that need to be recognized, and light areas as background.
2. Preprocessing: The digital image is cleaned to remove irrelevant pixels.
3. Text recognition: The dark portions are processed to find alphabetic letters, numeric digits or symbols. The characters are then identified by using one of two algorithms: pattern recognition or feature recognition.
Pattern recognition: This algorithm is used when the OCR program has previously been trained on examples of text in various fonts and formats to recognize characters by comparison. For this to work, the characters must be in a font that the OCR program has already been trained on, and because of this, pattern recognition works well only when the document is typed and it's hard to use for handwritten documents.
Feature recognition (detection or extraction): It applies rules regarding the features of a specific letter or number to recognize characters in the scanned document. Features include the number of angled lines, line intersections, loops or curves in a character.
4. Layout recognition: A more complete OCR program will also analyze the structure of a document image, where it divides the page into elements, such as blocks of text, tables or images. The lines are divided into words and then into characters. After the characters have been singled out, the program compares them with a set of pattern images and then returns the recognized text.
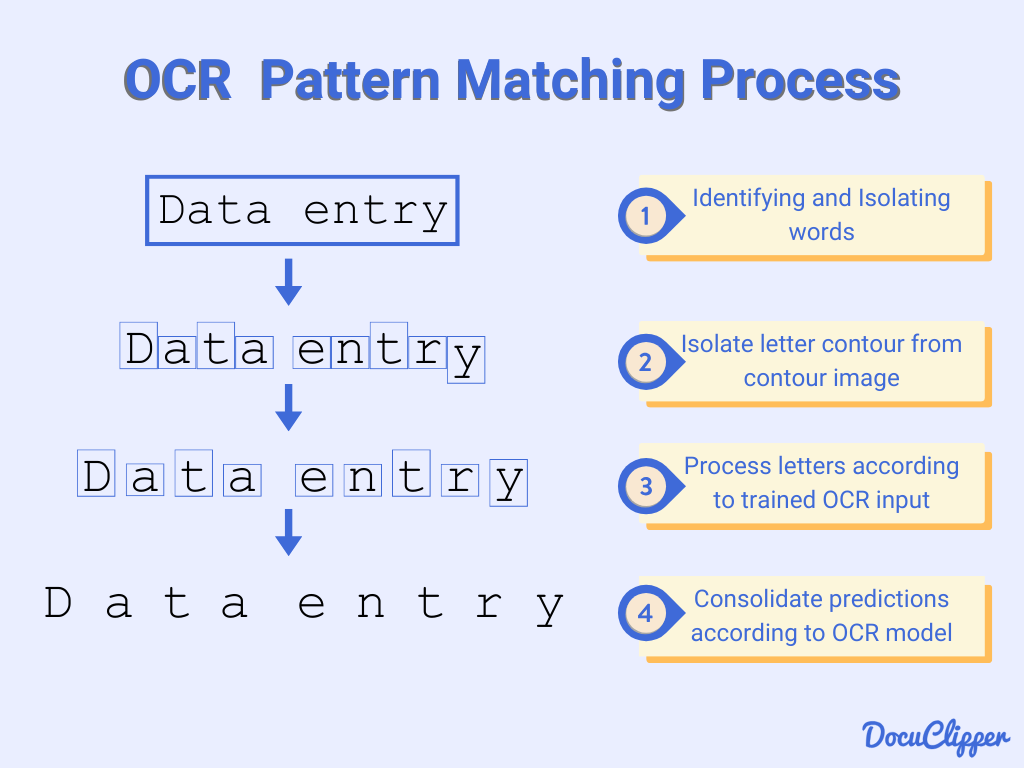
5. Postprocessing: Here, the OCR software further checks for accuracy to avoid any errors. The gathered information is then stored as a digital file, either in an editable form or PDF.
Real-world use cases
For a real-life example of OCR, one could say that our eyes are an optical mechanism, with the images seen by our eyes being the input for our brain. Although OCR cannot compete with human reading capabilities, this kind of technology functions similarly to our ability to read.
According to IBM (2024), the most well-known use case for OCR is converting printed paper documents into machine-readable text documents, which can accelerate workloads in many industries, including education, finance, healthcare, logistics and transportation, processing and retrieving loan documents, labels, invoices and receipts.
For example, banking and financial businesses use OCR technology to process data from cheques, bank statements or verify account numbers and transaction details, while healthcare organizations can use it to transcribe patients' records, insurance claims, pre-authorization forms, etc.
Some less-known use cases include data-entry automation, assisting blind and visually impaired persons and indexing documents for search engines, such as passports, license plates, invoices, etc.
Other OCR Tools
Since we are going to be working with Google Cloud AI to implement OCR, let’s also talk a little bit about other well-known APIs used for optical character recognition.
Tesseract
Being on the market as an open-source engine since 2005 (and developed by Google), makes Tesseract one of the most well-known OCR tools. It supports more than 100 languages and can be trained to recognize more, has AI integration to detect different text sizes, and supports multiple output formats. Tesseract can also be used as a command line program and has a library for developers to build their own applications. All Tesseract installation files can be found in its official GitHub repository, which is free for all users.
Amazon Textract
Amazon Textract uses machine learning to read, process and extract text from any document without having to do any manual configuration or needing ML expertise to use it, since it includes simple API operations to help analyze images and PDF files. It also offers pretrained and custom features to automate document processing, so it can be adjusted to specific needs. Unlike Tesseract, Amazon Textract uses custom pricing: you only pay for the documents you analyze.
IBM Automation Document Processing
This software combines AI with deep learning and low-code tooling to get rid of manual document processing for large volumes of unstructured data. The IBM Automation Document Processing (ADP) is a component included in the IBM Cloud Pak for Business Automation, which has many other automation capabilities and is mostly used by enterprises. ADP services are containerized and can run on local (on-premise) or cloud (private, public or hybrid) infrastructure, where you can run the IBM Cloud Pak.
Adobe Acrobat Pro
Adobe’s OCR tool applies text recognition algorithms to analyze images as they are scanned into Acrobat or by opening already existing files without having to install additional software, since it can be used from any browser. It is said to be a more pervasive software since it is less academic and more business-oriented.
Apps Script and Google Cloud project setup
A fundamental concept that can be found in the official documentation is: “Every Apps Script project uses Google Cloud to manage authorization, advanced services, and other details”. Because of this, we’ll need to create 2 new projects: an Apps Script project and a Google Cloud project. When we first create a project inside Apps Script, it’s automatically linked to a default Google Cloud project (that you never see or adjust), but since we will need to make some adjustments to implement OCR with Google Cloud AI, we need to have our own standard Cloud project.
For this tutorial, I’m going to be using Apps Script from a spreadsheet in Google Sheets. First create a new spreadsheet, go to the “Extensions” tab and click on “Apps Script”, this will automatically create and open an Apps Script project linked to that same spreadsheet. But, if you want your script to also run in other spreadsheets, at the end of this tutorial I’ll be explaining briefly how to turn the same script into an Add-on.

This spreadsheet will have the links to the documents and images where we will be applying OCR to (and that's also why we enabled the Google Sheets API before).
To create a Google Cloud project, just go to the Cloud Console and create a new project.
After creating both projects, linking them together is easy. We have to go to our Apps Script settings and scroll down a bit to see the “Google Cloud Platform (GCP) Project” section. Here we will click the “Change Project” button and input our Cloud project number.
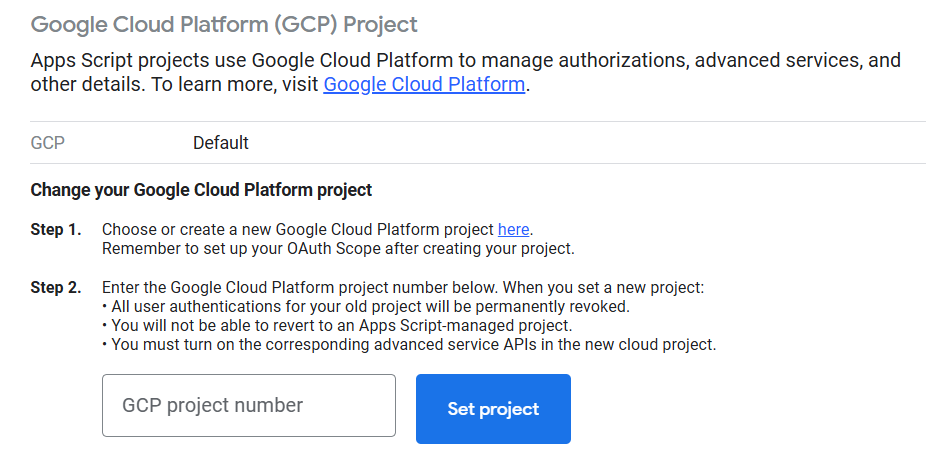
To get the project number, just go to your Google Cloud dashboard and look for the “Project info” section:

Google Cloud Project settings
Billing
First of all, make sure to have a functioning billing account linked to your project. The code we will be working on will not consume any credits, but the billing account is needed to use the Cloud Vision API. You can set this up by going to the navigation menu and clicking on the “Billing” option.
Authorization
To make API calls to Google Cloud, we have to authorize Cloud Shell first. You can do this by clicking the Cloud Shell icon on the right corner.

The Cloud Shell terminal will open with a dialog, click “Authorize” (It might tell you to log in with your Google account after).

Another way to do this would be by installing the Google Cloud CLI and running the command: gcloud auth login
Credentials
If you are working on a brand new Cloud project like me, we will need to configure the consent screen, which shouldn’t take more than 5 minutes. Go to the navigation menu, under the “APIs & Services” option, and look for “Credentials”. Here you will see a warning pop up telling you to configure the OAuth consent screen, click the button and fill out the information depending on your type of project.

To make calls to the Cloud Vision API, we’ll need an API Key, so let’s create it. In the “Credentials” page, click on “+ Create credentials” and then “API Key”. This will automatically create an API Key for us.


As the warning below says, the key we just created is currently unrestricted. You can edit its restrictions if needed in the “Edit API Key” menu.
Enabling APIs
To enable the APIs we will be using, go to your cloud project navigation menu and click the option “Enabled APIs & services” and then click the “+ Enable APIs and services” button


You will now see the API Library, where we will search for and enable the following APIs:
Cloud Vision API
App Script API
Google Drive API
Google Sheets API
Creating and setting up a service account
According to Google’s documentation, “A service account is a special kind of account typically used by an application or compute workload, such as a Compute Engine instance, rather than a person. (…) Applications use service accounts to make authorized API calls by authenticating as either the service account itself, or as Google Workspace or Cloud Identity users.”
We’ll be using a service account to make a certain type of call to the Cloud Vision API. To create one, go to “IAM & Admin” in the navigation menu, and click on “Service accounts”, there you will see the “+ Create Service Account” button.
The first step will be giving a name and description to your service account, and once you click “Create and continue” we will grant the service account a role in our project. In our case, this service account will have 2 roles: “Cloud Vision AI Service Agent” and also “Storage Object Viewer”. To add the second role, just click on “+ Add another role”.

If you want a specific user to have access to this service account, the third step allows you to do this. I’ll just leave it blank since it’s not necessary.

Now that we have created our service account, we need a key to use it in our code. To get this key, click on the three dots under “Actions” to display the menu, and click on “Manage keys”.

Go to the “Add key” button, and click “Create new key”. It will then ask you for the key type, select JSON.


It will automatically download a JSON file for you. We’ll need that file for later in the code, so make sure to rename it with a clear and identifiable name.
Apps Script Setup
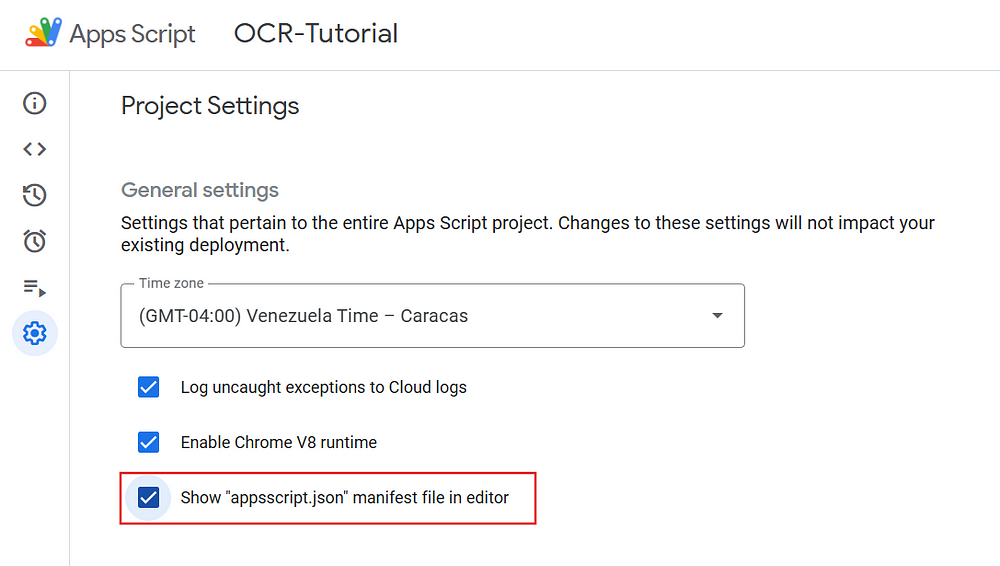
First, go to the project settings and enable the option “Show “appsscript.json” manifest file in editor”
Back in the Editor, we will see the new appsscript.json file. Here we will be adding the following scopes:
"oauthScopes": [
    "https://www.googleapis.com/auth/script.external_request",
    "https://www.googleapis.com/auth/devstorage.read_write",
    "https://www.googleapis.com/auth/drive.readonly",
    "https://www.googleapis.com/auth/spreadsheets",
    "https://www.googleapis.com/auth/cloud-platform"
  ]
Your appsscript.json file now should look something like this:

And with that, we have finished the project setup. Now, let’s dive into the implementation 🤓.
Detect text in images
If you try to follow Google’s documentation, you will notice that they only have the implementation for the gcloud console or programming languages like Go, Java, Python and Node.js. At first, I thought that the Cloud Vision API could be found as a service inside of Apps Script, but it’s actually not an option. That’s why we will have to follow the REST implementation, but modifying it to work on Apps Script since we won’t be using curl or PowerShell to send the request.
We’ll use a very basic example: In a spreadsheet, we will have a column of images as Google Drive links, and the script will extract the text of every image and paste it in another column, something like this:

Here you can find the link to the spreadsheet I used. By going to the menu tab “Extensions” and clicking on “Apps Script” you should be able to see the project that contains all the code from this tutorial.
Implementation in Apps Script
We will be using the first API key we created, you can find it on the “Credentials” page under “APIs & Services” on the navigation menu.

Let’s save that API key as a Script Property in our project. Go to “Settings”, scroll down to the very last section and click on “Add script property”. I’ll be saving it as “API_KEY”

Now, I’ll rename the file called “Code” to “Main” and create 2 new script files called “Images” and “Utils”, just to have a more organized code.

In the Utils.gs file, we will have the following functions to help us get the Google Drive links from our spreadsheet and validate them:
/**
 * Extracts the values from a specified range in a sheet.
 * This function dynamically calculates the range to extract values from based on
 * the starting row, the total number of columns, and identifies the last row
 * containing data. It skips blank rows at the end of the data.
 *
 * @param {Object} sheet - The sheet object to extract data from.
 * @param {number} startingRow - The starting row index (1-based).
 * @param {number} numColumns - The number of columns to include in the range.
 * @returns {Array<Array<any>>} - A 2D array containing the values from the specified range.
 */
function getTable(sheet, startingRow, numColumns) {
  var data = sheet.getDataRange().getValues();
  var lastRow = data.length; // Default to the total number of rows in the sheet
  // Loop through rows starting from the starting row
  for (var i = startingRow - 1; i < data.length; i++) { // `startingRow - 1` because `data` is 0-indexed
    if (data[i].join("").trim() === "") { // Check if the entire row is blank
      lastRow = i; // Set the last row to the current row
      break;
    }
  }
  // Get the range dynamically
  var range = sheet.getRange(startingRow, 1, lastRow - startingRow + 1, numColumns);
  var values = range.getValues(); // Get the values from the dynamic range
  return values;
}

/**
 * Extracts the file ID from a Google Drive file URL.
 * @param {string} url - The URL of the Google Drive file.
 * @returns {string} - The extracted file ID.
 */
function extractFileId(url) {
  var validate = isValidDriveLink(url);

  if (validate === true) {
    const match = url.match(/[-\w]{25,}/); // Google Drive file IDs are 25+ characters
    return match[0];
  } else {
    throw new Error('Invalid Google Drive URL');
  }
}

/**
  * Validates Google Drive links.
  * @param {string} url - The URL of the Google Drive file.
  * @returns {string/boolean} - Returns a "true" boolean value or an error message.
  */
function isValidDriveLink(url) {
  if (url === ""){
    Logger.log("Missing URL");
    return "Missing URL"
  }
  // Regular expression to extract the Google Drive file ID
  const regex = /(?:drive\.google\.com\/(?:file\/d\/|open\?id=)|docs\.google\.com\/\w+\/d\/)([a-zA-Z0-9_-]{33,})/;
  const match = url.match(regex);

  if (!match) {
      Logger.log("Invalid URL format.");
      return "Invalid URL format."; // URL is not a valid Google Drive link
  }

  const fileId = match[1];
  try {
      // Try to access the file
      const file = DriveApp.getFileById(fileId);
  } catch (e) {
      Logger.log("Error: " + e.message);
      Logger.log("File not found or access restricted.");
      return "File not found or access restricted."; // File is either non-existent or permission is restricted
  }
  return true;
}
The Images.gs file will contain our extractTextFromImage function, where we will call the Cloud Vision API to obtain the extracted text from an image blob.
function extractTextFromImage(blob){
  try {
    const base64Image = Utilities.base64Encode(blob.getBytes());
    var APIKey = PropertiesService.getScriptProperties().getProperty('API_KEY');
    // Make a POST request to Vision API with a JSON payload.
    var visionApiUrl = 'https://vision.googleapis.com/v1/images:annotate?key=' + APIKey;

    var JSON_REQ = buildJSONRequestImages(base64Image);

    var options = {
      'method': 'POST',
      'contentType': 'application/json',
      'payload': JSON_REQ
    };

    var response = UrlFetchApp.fetch(visionApiUrl, options).getContentText();
    var text = JSON.parse(response)

    return text.responses[0].fullTextAnnotation.text;
  } catch (error) {
    Logger.log(`Error processing link: ${error.message}`);
  }
}

function buildJSONRequestImages(base64Image) {
  return JSON.stringify({
    requests: [{
      image: {
            content: base64Image,
          },
      features: [{
        type: "DOCUMENT_TEXT_DETECTION",
        maxResults: 1
      }]
    }]
  });
}
And lastly, in our Main.gs file, we will first call the getTable function from our Utils.gs file to get the data from our spreadsheet according to the starting row index (2) and the number of columns (1) we want to extract. Then, we will use the extractTextFromImage Function inside a loop to go through the data array, making sure to check the type of file beforehand, since the spreadsheet will include both images and PDF files.
function detectTextWithOCR() {
  var sheet = SpreadsheetApp.getActiveSpreadsheet().getActiveSheet();
  const data = getTable(sheet, 2, 1);

  for (var i = 0; i < data.length; i++) {
    var link = data[i][0];
    const fileId = extractFileId(link);
    const file = DriveApp.getFileById(fileId);
    const fileType = file.getMimeType();

    if (fileType.includes("image")){
      var text = extractTextFromImage(file.getBlob());
 if (text){
        Logger.log("Text extracted successfully")
      }
      sheet.getRange("B"+ (i+2)).setValue(text);
    }
  }
}
To see the code in action, first we will need to add the images we want to process as Google Drive links on the spreadsheet we created. And make sure the links have public access!

To compile the code, simply click the “Run” button in our Apps Script project. Alternatively, you can add the following code snippet to the Utils.gs file to create a new tab menu, allowing you to run the code directly from the spreadsheet.
function onInstall(e){
  onOpen(e);
}

function onOpen(e){
  var ui = SpreadsheetApp.getUi();
  ui.createMenu('OCR Tool')
  .addItem('Extract Text', 'detectTextWithOCR')
  .addToUi();
}
It should show up like this. And if it doesn’t, try running the code once from the Apps Script project.

Detect text in PDFs
You might have noticed that detecting text in images doesn’t require us to do many steps inside our code. Well, for PDF files is a completely different story.
You can find the more detailed steps in the official documentation, but there are a few things that work very differently inside Apps Script. I noticed this when I was working on a project using the Cloud Vision API for the very first time, so this entire step-by-step is thanks to a lot of trial and error 🤓.
When I first tried doing a files:asyncBatchAnnotate request using the same API key from before, It failed. Then I noticed that the authentication section of the documentation says the following:

This is the reason why we needed to create a service account, but when clicking on the link for the instructions on the authentication, the documentation it’s not that helpful, even less for our implementation in Apps Script. So, in the code I will be showing you a function for generating this OAuth2 access token and authenticating with Google Cloud services using a service account.
Also, we will have to store the PDF files in Google Cloud Storage in order to use the OCR request, since it uses a path to a file in a Cloud Storage bucket instead of base 64 encoding like it did for the images.
Now, let’s summarize the steps we have to follow for this process:
Add the PDF file we want to analyze to our Cloud Storage.
Get an access token using a service account.
Send the request to the Cloud Vision API.
Use the operation ID from the previous request to retrieve the Vision annotation response.
Check if the operation has been completed.
When completed, retrieve the output file that was written to Cloud Storage as text.
Delete all used files from Cloud Storage.
Implementation in Apps Script
Before we start, make sure to create and set up a bucket in your Cloud Storage inside our Google Cloud project. Go to the navigation menu and search for Cloud Storage, click on the Buckets option and then the “+ Create” button

Your bucket’s name will serve as an ID in our code, so choose a clear and easily recognizable name. Below are the settings for the bucket I created for this tutorial:

To make the writing and deletion of files from Apps Script work, remember to give your storage bucket fine-grained access control and also give the service account storage object viewer permissions (we did this when first creating our service account).
Now, let’s add new script properties to our project. This time, we’ll be storing the JSON key we got back when we first created our service account and also the name we gave to our Cloud Storage bucket.
For the service account key, open the JSON file (you can use Windows Notepad or any other text editor) and copy all of its contents. Go to the script properties section in project settings, add a new property, and paste the JSON file contents as the value and give it a name. I’ll be naming it “SERVICE_ACC_KEY”.
And for the Cloud Storage bucket, I’ll be using “BUCKET_NAME” as the property name. The value should be the same as the name of the bucket we just created.
Your script properties should now look something like this. Don’t forget to save the changes!

Now we are ready to start coding 🧑🏽💻
First, I’ll be creating a new script file called “PDFs” for most of the new code.

In there, we will have the following functions:
/**
 * Extracts text from a PDF file using Google's Vision API.
 *
 * @param {File} file - The PDF file to process.
 * @param {Blob} blob - The file blob for storage operations.
 * @returns {string|null} The extracted text from the PDF, or null if an error occurs.
 */
function extractTextFromPDF(file) {
  var blob = file.getBlob();
  // Upload the file to cloud storage under the specified bucket
  const BUCKET_NAME = PropertiesService.getScriptProperties().getProperty('BUCKET_NAME');
  var resource = addFileToCloudStorage(blob, BUCKET_NAME, file.getName());

  if (resource) {
    // Define the Vision API endpoint for asynchronous PDF text detection
    var visionApiUrl = 'https://vision.googleapis.com/v1/files:asyncBatchAnnotate';

    // Construct the JSON request payload for the API call
    const JSON_REQ = buildJSONRequestPDFs(file.getName(), BUCKET_NAME);

    // Obtain the authentication token required for the API request
    const ACCESS_TOKEN = getAccessToken();

    // Configure request options
    var options = {
      'method': 'POST',
      'contentType': 'application/json',
      'headers': {
        "Authorization": "Bearer " + ACCESS_TOKEN
      },
      'payload': JSON_REQ,
      'muteHttpExceptions': true, // Avoid throwing HTTP errors
    };

    // Send the request and capture the response
    var response = UrlFetchApp.fetch(visionApiUrl, options).getContentText();
    Logger.log(response);

    // Extract the operation name from the response for tracking progress
    var operationName = JSON.parse(response).name;
    const delayMs = 3000; // Delay time between API status checks

    // Extract the operation ID for checking completion status
    const operationId = operationName.split('/').pop();
    const url = `https://vision.googleapis.com/v1/operations/${operationId}`;

    var result = {done: false};

    // Loop until the text extraction process is completed
    while (!result.done) {
      try {
        // Fetch the operation status using the stored operation ID
        const response = UrlFetchApp.fetch(url, {
          method: 'GET',
          headers: {
            "Authorization": "Bearer " + ScriptApp.getOAuthToken()
          }
        });

        const result = JSON.parse(response.getContentText());

        // Check if the operation is completed
        if (result.done) {
          // Retrieve the extracted text from the output file
          var output = getOutputFileAsText(BUCKET_NAME);

          // Delete individual output files after extraction to clean up storage
          output.pageNumbers.map((n) => {
            deleteFileFromCloudStorage(BUCKET_NAME, `output-${n}-to-${n}.json`);
          });

          // Remove the original PDF file from cloud storage
          deleteFileFromCloudStorage(BUCKET_NAME, file.getName());

          return output.text; // Return the extracted text
        }

        console.log(`Operation still in progress...`);
        Utilities.sleep(delayMs); // Wait before retrying
      } catch (error) {
        // Log and return null if an error occurs during API calls
        console.error('Error fetching Vision API response:', error);
        return null;
      }
    }
  } else {
    return null; // Return null if file upload to cloud storage fails
  }
}

function buildJSONRequestPDFs(fileName, BUCKET_NAME){
  return JSON.stringify({
  requests:[
      {
        inputConfig: {
          gcsSource: {
            uri: `gs://${BUCKET_NAME}/` + fileName
          },
          mimeType: "application/pdf"
        },
        features: [
          {
            type: "DOCUMENT_TEXT_DETECTION"
          }
        ],
        outputConfig: {
          gcsDestination: {
            uri: `gs://${BUCKET_NAME}/`
          },
          batchSize: 1
        }
      }
    ]
  });
}

/**
 * Generates and retrieves an access token using a service account for authentication.
 *
 * @returns {string} The access token required for making authenticated requests.
 * @throws {Error} If the service account JSON key is missing.
 */
function getAccessToken() {
  // Retrieve the JSON key for the service account from script properties
  const jsonKey = PropertiesService.getScriptProperties().getProperty('SERVICE_ACC_KEY');

  // Ensure the JSON key is available before proceeding
  if (!jsonKey) {
    throw new Error('Service account JSON key is missing. Please add it in Script Properties.');
  }

  // Parse the JSON key to extract required authentication credentials
  const serviceAccount = JSON.parse(jsonKey);

  // Define the JWT payload with essential authentication parameters
  const jwt = {
    "iss": serviceAccount.client_email, // Service account email for authentication
    "scope": "https://www.googleapis.com/auth/cloud-platform", // Scope for accessing cloud services
    "aud": "https://oauth2.googleapis.com/token", // Audience URL for token exchange
    "exp": Math.floor(Date.now() / 1000) + 3600, // Expiration time (1 hour from now)
    "iat": Math.floor(Date.now() / 1000) // Issued at time
  };

  // Define the JWT header specifying the algorithm used for signing
  const header = { "alg": "RS256", "typ": "JWT" };

  // Encode the header and claim set using base64 encoding
  const encodedHeader = Utilities.base64EncodeWebSafe(JSON.stringify(header));
  const encodedClaimSet = Utilities.base64EncodeWebSafe(JSON.stringify(jwt));

  // Compute the RSA SHA256 signature using the service account's private key
  const signature = Utilities.computeRsaSha256Signature(`${encodedHeader}.${encodedClaimSet}`, serviceAccount.private_key);

  // Encode the signature using base64 encoding for secure transmission
  const encodedSignature = Utilities.base64EncodeWebSafe(signature);

  // Construct the final JWT token by combining all encoded components
  const jwtToken = `${encodedHeader}.${encodedClaimSet}.${encodedSignature}`;

  // Exchange the generated JWT for an access token using Google's OAuth2 endpoint
  const response = UrlFetchApp.fetch("https://oauth2.googleapis.com/token", {
    method: "post",
    payload: {
      "grant_type": "urn:ietf:params:oauth:grant-type:jwt-bearer", // Specifies JWT-based authentication
      "assertion": jwtToken // Provides the generated JWT token for authentication
    }
  });

  // Parse and return the access token from the API response
  return JSON.parse(response.getContentText()).access_token;
}

/**
 * Retrieves extracted text from output files stored in a Google Cloud Storage bucket.
 * The function loops through possible output files and compiles their text contents.
 *
 * @param {string} BUCKET_NAME - The name of the bucket containing the file to retrieve.
 *
 * @returns {Object} An object containing the extracted text and the processed page numbers.
 */
function getOutputFileAsText(BUCKET_NAME) {
  var fullText = ""; // Stores the accumulated extracted text
  var pageNumbers = []; // Stores the page numbers processed
  var i = 1; // Start from the first file

  while (true) {
    fileName = `output-${i}-to-${i}.json`; // Construct file name
    const url = `https://storage.googleapis.com/storage/v1/b/${BUCKET_NAME}/o/${encodeURIComponent(fileName)}?alt=media`; // Generate the request URL
    let response;

    try {
      // Attempt to fetch the JSON output file from the bucket
      response = UrlFetchApp.fetch(url, {
        method: 'GET',
        headers: {
          "Authorization": "Bearer " + ScriptApp.getOAuthToken() // Use OAuth token for authentication
        }
      });
    } catch (error) {
      // Log and break the loop when a file is not found
      Logger.log(`Output file ${fileName} not found, stopping loop.`);
      break;
    }

    // Convert the fetched data to a JSON object
    const jsonText = response.getBlob().getDataAsString();
    const jsonData = JSON.parse(jsonText);

    // Extract page number if available
    if (jsonData.responses && jsonData.responses[0].context) {
      pageNumbers.push(jsonData.responses[0].context.pageNumber);
    }

    Logger.log("Pages processed: " + pageNumbers);

    // Extract text content from the annotation, fallback to empty string if missing
    let extractedText = jsonData.responses[0]?.fullTextAnnotation?.text || "";

    // Append extracted text with a space separator if multiple pages exist
    fullText = fullText ? fullText + " " + extractedText : extractedText;

    i++; // Increment page number
  }

  // Return the extracted text and processed page numbers
  return { text: fullText, pageNumbers: pageNumbers };
}
ExtractTextFromPDF works by first uploading the PDF to Cloud Storage, and once uploaded, it sends a request to the Vision API for asynchronous text detection, including authorization and necessary request parameters. The function then continuously checks the API’s operation status until the extraction is complete. Once the text extraction is finished, it retrieves the extracted text from the output file(s) stored in the storage bucket using the function getOutputFileAsText, cleans up temporary files in the bucket, and returns the processed text. If any errors occur during the process, it logs them and returns null to indicate failure.
Now, in our Utils.gs file, we’ll add two new functions: one to upload the PDFs being processed to our storage bucket, and another to delete files from the storage bucket once the process is complete.
The usage of the second function could be optional, but removing temporary files will help us prevent unnecessary storage accumulation. And if you decide not to delete the output files from the storage after each text extraction, it might mess up the retrieval of those files inside the extractTextFromPDF function, since that would mean having multiple output files of different PDF files, so you would need to modify the code accordingly.
/**
 * Adds a Blob to a Google Cloud Storage bucket.
 *
 * @param {Blob} BLOB - The Blob of the file to add to the bucket.
 * @param {string} BUCKET_NAME - The name of the bucket to add the file to.
 * @param {string} OBJECT_NAME - The name/path of the file to add.
 * @return {Object} objects#resource
 *
 * @example
 * const fileBlob = addFileToCloudStorage(driveBlob, 'my-bucket', 'path/to/my/file.txt');
 */
function addFileToCloudStorage(BLOB, BUCKET_NAME, OBJECT_NAME) {
  const bytes = BLOB.getBytes();

  // Base URL for Cloud Storage API
  const url = `https://www.googleapis.com/upload/storage/v1/b/${BUCKET_NAME}/o?uploadType=media&name=${encodeURIComponent(OBJECT_NAME)}`;
  try {
    const response = UrlFetchApp.fetch(url, {
      method: 'POST',
      contentLength: bytes.length,
      contentType: BLOB.getContentType(),
      payload: bytes,
      headers: {
        "Authorization": "Bearer " + ScriptApp.getOAuthToken()
      }
    });
    const uploadedFile = JSON.parse(response.getContentText());

    // Make the file publicly accessible
    const aclUrl = `https://www.googleapis.com/storage/v1/b/${BUCKET_NAME}/o/${encodeURIComponent(OBJECT_NAME)}/acl`;
    const aclPayload = JSON.stringify({
      entity: "allUsers",
      role: "READER"
    });

    UrlFetchApp.fetch(aclUrl, {
      method: 'POST',
      contentType: "application/json",
      payload: aclPayload,
      headers: {
        "Authorization": "Bearer " + ScriptApp.getOAuthToken()
      }
    });

    return uploadedFile;
  } catch (error) {
    console.error('(addFileToCloudStorage) Error getting file:', error);
    return null;
  }
}

/**
 * Deletes a file from a Google Cloud Storage bucket.
 *
 * @param {string} BUCKET_NAME - The name of the bucket containing the file to delete.
 * @param {string} OBJECT_NAME - The name/path of the file to delete.
 * @return {boolean} - True if the file was deleted successfully, false if not.
 *
 * @example
 * const fileBlob = addFileToCloudStorage(driveBlob, 'my-bucket', 'path/to/my/file.txt');
 */
function deleteFileFromCloudStorage(BUCKET_NAME, OBJECT_NAME) {
  const url = `https://storage.googleapis.com/storage/v1/b/${BUCKET_NAME}/o/${encodeURIComponent(OBJECT_NAME)}`;

  // Send DELETE request to GCS
  const options = {
    'method': 'DELETE',
    'headers': {
      "Authorization": "Bearer " + ScriptApp.getOAuthToken()
    },
  };

  const response = UrlFetchApp.fetch(url, options);
  const statusCode = response.getResponseCode();

  if (statusCode === 204) {
    Logger.log(`File "${OBJECT_NAME}" successfully deleted from bucket "${BUCKET_NAME}".`);
    return true;
  } else {
    Logger.log(`Failed to delete file. Response: ${response.getContentText()}`);
    return false;
  }
}
And lastly, let’s make the following modifications to our Main.gs file to be able to process both images and PDFs:
function detectTextWithOCR() {
  var sheet = SpreadsheetApp.getActiveSpreadsheet().getActiveSheet();
  const data = getTable(sheet, 2, 1);

  for (var i = 0; i < data.length; i++) {
    var link = data[i][0];
    const fileId = extractFileId(link);
    const file = DriveApp.getFileById(fileId);
    const fileType = file.getMimeType();

    var extractedText = "";
    if (fileType.includes("image")){
      Logger.log("Processing image...")
      extractedText = extractTextFromImage(file.getBlob());
    } else {
      Logger.log("Processing PDF...")
      extractedText = extractTextFromPDF(file);
    }

    if (extractedText){
      Logger.log("Text extracted successfully");
      sheet.getRange("B"+ (i+2)).setValue(extractedText);
    } else {
      Logger.log("Error extracting text, check file");
      continue;
    };
  }
}
And done! To try it this part of the code remember to update your spreadsheet with more Google Drive links, but this time PDF files. Again, you can simply click on the “Run” button inside of our project or use the code snippet I showed you previously to have a menu tab in your spreadsheet that allows you to run it anytime.
Common troubleshooting tips
Error 403: “Insufficient Permission”
I was getting the following error repeatedly when first using the function addFileToCloudStorage:
Error getting file: { [Exception: Request failed for https://www.googleapis.com returned code 403. Truncated server response: {
  "error": {
    "code": 403,
    "message": "Insufficient Permission", …
The solution was to add the missing OAuth Scopes inside the appsscript.json file. Even I forgot to do this step while writing this tutorial, oops!

Not giving your service account the appropriate permissions will lead to authorization errors. Don’t forget to assign to it both “Cloud Vision AI Service Agent” and “Storage Object Viewer” roles.
Make sure your Cloud Storage bucket uses fine-grained access control rather than uniform. When I first attempted to add a file to the bucket, the default configuration was set to uniform access, which was causing me issues.
Conclusion
Implementing OCR capabilities with the Cloud Vision API in Google Apps Script opens up a wide array of possibilities for automating document processing and data extraction workflows. By leveraging the seamless integration between Google services and the API, users are able to develop tailored solutions that significantly reduce manual effort and improve accuracy. Whether for extracting text from PDFs stored in Google Drive or processing images in a collaborative environment like Google Sheets, this approach provides a flexible and scalable way to incorporate advanced OCR functionalities into everyday tools.
Looking forward, the approach outlined in this tutorial encourages further experimentation and customization. As OCR technology continues to evolve, integrating it into cloud-based workflows offers immense potential for enhancing productivity and data insights. Whether you’re working on personal automation or building professional solutions, understanding how to use OCR tools can be a valuable addition to your toolkit. Happy coding and exploring the power of AI-driven text recognition! 🤓.
References
Commons, M. (2010). LibGuides: Introduction to OCR and searchable PDFs: Adobe Acrobat Pro. https://guides.library.illinois.edu/c.php?g=347520&p=4116755
John, R. (2025). A comprehensive guide to OCR APIs (+10 best tools in 2025). Docsumo.com. https://www.docsumo.com/blogs/ocr/api
Russell, J. (2021). Library guides: Optical Character Recognition (OCR): An introduction: Home. https://guides.libraries.psu.edu/OCR
Ukil, R. (2023). 3 steps to measuring effectiveness of OCR and cash application automation. HighRadius Resource Center; HighRadius. https://www.highradius.com/resources/Blog/3-steps-to-measuring-effectiveness-of-ocr-and-cash-application-automation/
What is optical character recognition (OCR)? (2025). Ibm.com. https://www.ibm.com/think/topics/optical-character-recognition